Scroll to TOP of page
Life123 : Dynamical Modeling of Biological Systems
HomeQUICK START / 1-clickTechnologyExperimentsGuideVisualizationDiffusionReactionsMembranesHistoryDownloadContact / Participate

Download / Install

Have you considered the other options that require NO INSTALLATION?   Check out the "Quick Start" section

METHOD 1 — For most users:
QUICK-AND-EASY method to run the life123 libraries locally

In brief: use pip install life123 , for example on Colab or on your IDE (such as PyCharm, etc), then download some Jupyter notebooks from the repository (look for the ipynb file suffix), and run/modify them as you please! (Assuming you have JupyterLab installed.)

Don't like notebooks? No problem – you can simply download and use their python-file .py versions, also provided in the same repository pages, above.

MINIMALIST EXAMPLE (NO plots and NO notebooks) using an IDE:

Use your favorite IDE (we tried PyCharm 2022.3 on Win 10/11):

  1. Start a new project, with a new environment using "virtualenv" and a base intepreter using Python 3.8 or higher (if Python isn't found on your device, PyCharm can install it for you)
  2. At the project's top level, create a new file named requirements.txt
  3. Inside that file, place the line life123==1.0.0b35   (CHANGE version number as needed; see changelog)
  4. Pycharm will show a link to "Install requirement" : click on it, and wait for install to complete (dependencies, such as NumPy and plotly, are automatically installed as well)
  5. At the project's top level, create a new pyhon file, with the line import life123 and the line print(life123.__version__)
  6. Run the python script you just created
  7. For code examples, look thru .ipynb Jupyter notebooks (and their .py synchronized python files) from the repository

Screenshot (PyCharm 2022.3 on Win10):
Click to enlarge


EXAMPLE - Plots, WITHOUT notebooks, using an IDE:

Do all the steps from the "Minimalist Example" in the above box. Then create and run, just like before, a python script (SIMPLE EXAMPLE) that produces a plot (the plotly library is used by Life123 for visualizations, and automatically installed when you install life123)

Since you're not using Jupyter notebooks, the plot will open in a browser (automatically launched.)


EXAMPLE - WITH JupyterLab notebooks, using an IDE:

Do all the steps from the "Minimalist Example" box, above. Then:

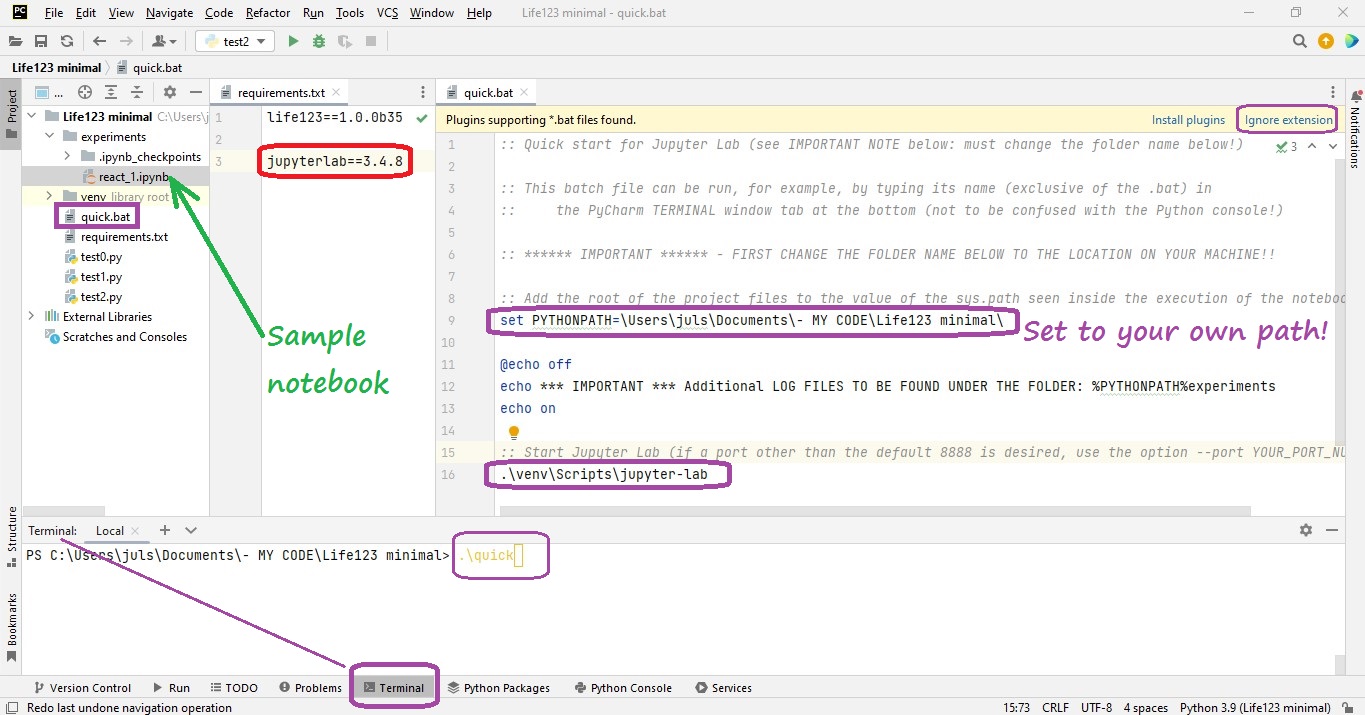
  1. At the project's top level, create a new file named quick.bat : into it, copy the contents of that file from the repository
    REQUIRED CHANGES in quick.bat file:
    A) the line that starts with SET PYTHONPATH to the path of your own project folder
    B) on Win11, change the last line from jupyter-lab to .\venv\Scripts\jupyter-lab
  2. At the project's top level, create a new directory named experiments
  3. In the requirements.txt file, add the line jupyterlab==3.4.8   (or whichever version you want to use; this is the one we're testing on), and then click on PyCharm's "Install requirement" link
  4. Open the Pycharm's "Terminal" tab, at the very bottom (not to be confused with the "Python Console" tab!)
    On Win11, if you get an error that "activate.ps1 cannot be loaded because running scripts is disabled on this system", enter:
    Set-ExecutionPolicy -Scope CurrentUser -ExecutionPolicy Unrestricted -Force
    (if you now enter Get-ExecutionPolicy , it should say Unrestricted ; more info)
  5. In the terminal tab, type quick (on Win11, type the full .\quick ); your default browser should now open with a tab set to localhost:8888/lab , giving you access to JupyterLab
  6. Using JupyterLab, navigate to the experiments folder you created earlier. Either create your own notebook, or download one of the ipynb files from the repository to your local device, and then drag-and-drop it to that experiments folder. Example of a simple notebook (Note: make sure to COMMENT OUT the line import set_path before running that notebook)

Screenshot (PyCharm 2022.3 on Win11):
Click to enlarge


JupyterLab

    "JupyterLab is the next-generation user interface for Project Jupyter  
    offering all the familiar building blocks of the classic Jupyter Notebook  
    in a flexible and powerful user interface.  
    JupyterLab will eventually replace the classic Jupyter Notebook."


Of particular relevance to this project, with JupyterLab, you can easily inspect the HTML log files (with the graphic outputs of program runs):
just right-click on them, and request "Open in New Browser Tab", as shown below:


and here's that HTML file from above, viewed in a browser:


METHOD 2 — For project contributors, or anyone wanting to get into the Life123 internals:
Complete Install on your machine

Copy the files from the repository to your local machine.

Method 1) On a Linux machine, you can use the command:

    sudo git clone --verbose --config http.sslVerify=false https://github.com/BrainAnnex/life123.git YOUR_LOCAL_DIRECTORY

Method 2) You can download a zip file from the repository


Install, if not already present on your machine, Python 3.8+

We currently test on Python 3.8 (earlier versions will NOT work, because of the various libraries.)

Note that Python 3.8 is the last version of python still compatible with Win7.   We currently still support Win7, but not for long.


OTHER ways to run Life123 (for more advanced users)

SET UP the virtual (local) environment

If you opt to handle setting up the virtual environment yourself, on Linux you can do:

    $ sudo apt install python3.8-venv   (if needed)
    $ python3 -m venv /path_to_root_folder_where_the_files_are/venv
    $ cd source /path_to_root_folder_where_the_files_are
    $ source venv/bin/activate
    (venv) $ pip3 install -r requirements.txt
    (venv) $ deactivate

(or use pipenv or your favorite tool.)

All dependencies (such as NumPy and Jupyter notebooks) are specified in the file  requirements.txt


USING the virtual (local) environment

To use the virtual environment’s packages/resources in isolation (i.e. without an IDE), you need to “activate” it. 

To activate the virtual environment:

On Linux:

    $ cd source /path_to_root_folder_where_the_files_are
    $ source venv/bin/activate
    (venv) $       


On Windows 7, if using the Command Prompt:

    D:    (or whichever drive you copied the files to)
    cd "\path_to_root_folder_where_the_files_are"
    EXAMPLE:  cd "\Docs\- MY CODE\BioSimulations\life123-Win7\"
    
    .\venv\Scripts\activate

    
       You will now see this prompt:
    (venv) DRIVE_LETTER:\path_to_root_folder_where_the_files_are>


On Windows 7, if using the PowerShell:

In order to use the PowerShell on Windows7 to run scripts,
one must first run it with admin privileges, and issue the command  Set-ExecutionPolicy unrestricted , and then say  Y  to the prompt  (disregard the complaints about "the setting is overridden by a policy defined at a more specific scope"!)

    D:    (or whichever drive you copied the files to)
    cd "\path_to_root_folder_where_the_files_are"
    EXAMPLE:  cd "\Docs\- MY CODE\BioSimulations\life123-Win7\"
    
    .\venv\Scripts\activate

    
       You will now see this prompt:
    (venv) PS DRIVE_LETTER:\path_to_root_folder_where_the_files_are>

In either case, notice how your prompt is now prefixed with the name of your environment (venv, in our case).  
This is the indicator that venv is currently active, which means the python executable will only use this environment’s packages and settings.


Specifying the root path, and running Python scripts

When using an IDE such as PyCharm, the IDE automatically adds the root of the Life123 files  (i.e. the location
of the PyCharm project) to the value of the  sys.path seen inside the execution of the Python files.

If you opt not to use an IDE, or if you're using Jupyter notebooks (such as the ones provided in Life123's  experiments  folder), an extra step is necessary.

IMPORTANT: all steps below are AFTER doing the steps described in the earlier section.
You should be in the local environment, and your prompt should be prefixed by (venv)

On Linux:

    (venv) $ export PYTHONPATH=$PYTHONPATH:`pwd`/venv/lib/python3.8/site-packages
    (NOTE: you might need to change the path /venv/lib/python3.8/site-packages to whatever is on your machine)
    (venv) $ echo $PYTHONPATH 
    [To verify!]


On Windows 7, if using the Command Prompt:

set PYTHONPATH=.  will add the  path_to_Life123_root_folder  (the current directory) to the sys.path.

You can verify that it got set, by issuing:  set PYTHONPATH


On Windows 7, if using the PowerShell:

$env:PYTHONPATH="."  will add the path_to_Life123_root_folder  (the current directory) to the sys.path.

You can verify that it got set, by issuing:  $env:PYTHONPATH


Now, you can issue commands such as:

python experiments/diagnostics.py            (this script will print out sys.path and some other values)
python experiments/life_1D/diffusion/reach_equilibrium.py

Note that setting PYTHONPATH to a dot will NOT work for Jupyter Notebooks (see the next section.)


Specifying the root path, and running JupyterLab

IMPORTANT: all steps below are AFTER doing the steps described in the section about activating the virtual environment.

On Windows 7, if using the Command Prompt:

   set PYTHONPATH=\path_to_Life123_root_folder\
  
EXAMPLE:  set PYTHONPATH=\Docs\- MY CODE\BioSimulations\life123-Win7\
     You can verify it, by issuing:  set PYTHONPATH

On Windows 7, if using the PowerShell:

    $env:PYTHONPATH="\path_to_Life123_root_folder\"
    EXAMPLE:  $env:PYTHONPATH="\Docs\- MY CODE\BioSimulations\life123-Win7\"
    You can verify it, by issuing:  $env:PYTHONPATH

Next, start JupyterLab:

    a) jupyter-lab
    OR
    b) jupyter notebook "path_and_name_of_your_desired_notebook"
        EXAMPLE:  jupyter notebook "\Docs\- MY CODE\BioSimulations\life123-Win7\experiments\life_1D\diffusion\reach_equilibrium.ipynb"
    OR
    c)  jupyter notebook --notebook-dir="path_and_name_of_your_desired_startup_folder"
        EXAMPLE:  jupyter notebook --notebook-dir="\Docs\- MY CODE\BioSimulations\life123-Win7\experiments"
        (note: you will not be able to navigate to the parent of the startup folder!)  

Alternatively, the  quick.bat  file could be run, after editing it to specify the name of the local folder and, optionally, to change the requested Jupyter notebook startup folder.

To run it on Windows7 with the command prompt, issue the command:  quick
To run it on Windows7 with the PowerShell, issue the command: .\quick.bat


A new browser tab should automatically open.

If you didn't specify the full name of a notebook when starting jupyter (scenario a, above), navigate to the Jupyter notebook of interest. 

The notebooks that are distributed with Life123 are under the  experiments  top-level folder.

If you want to verify that the sys.path is correct, you can add an extra cell to a notebook, and issue the commands:

import sys
sys.path

the result of running those commands should be a list that includes the path_to_Life123_root_folder that you specified.

Note: in case you neglected to set the sys.path when starting Jupyter notebook, you can also set it from within the notebook.
Add a new cell, and run the command: sys.path.append('path_to_Life123_root_folder') .  
Make sure to use double-slashes to represent backslashes in the string.  EXAMPLE:
sys.path.append('D:\\Docs\\- MY CODE\\BioSimulations\\life123-Win7')


Ports:

Port 8888 is used by default; if you want a different one,
you can start jupyter notebook with an option such as:

jupyter-lab --port 9999